
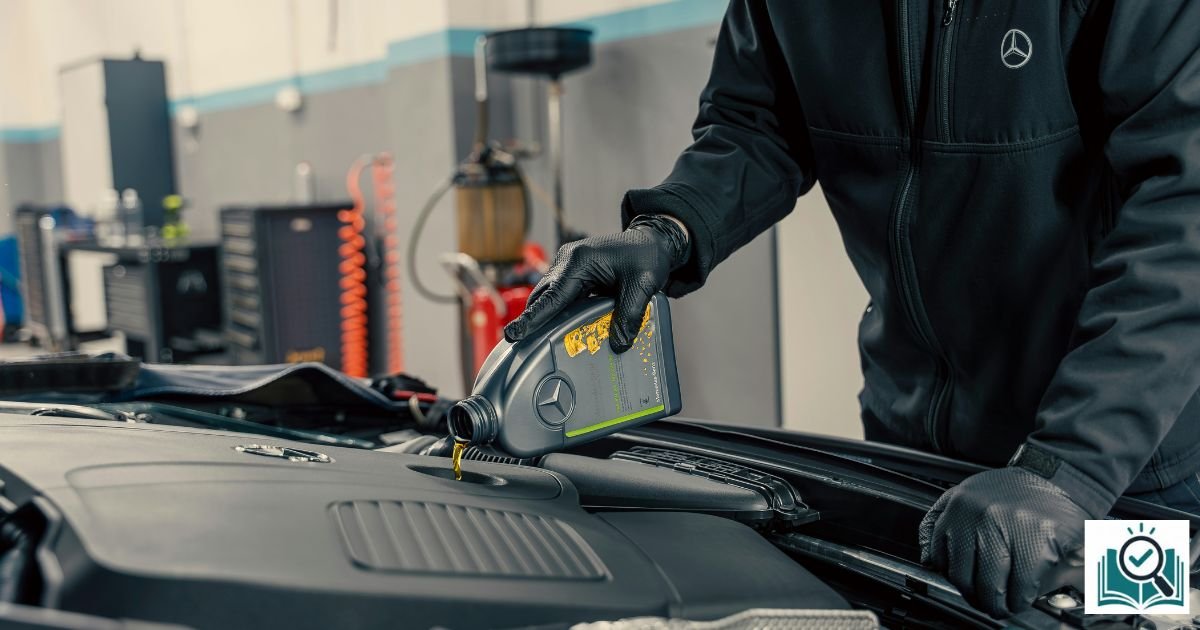
Learning how to check oil is one of the simplest ways to protect your car from expensive repairs. A quick inspection takes only a few minutes yet it can reveal problems before they become serious. By checking the engine oil regularly, you help keep the parts moving with proper lubrication while reducing wear and improving overall performance.
With a dipstick and a clean rag, you can check the oil level in seconds. This guide explains how to check oil step by step – from parking on level ground with the engine off, to reading the marks on the dipstick, to topping up oil and even picking the right motor oil. By the end, you’ll know exactly how to check engine oil and how to keep your engine protected.
What You Need to Check Your Car’s Oil
Learning how to check oil is one of the easiest things you can learn. First, you need the oil dipstick, a clean rag or paper towel to wipe it, and a flashlight. Wear gloves also. Have a funnel ready and be sure you have the correct type of engine oil on hand (your manual tells you the oil grade and viscosity needed, like 0W-20 or 5W-30).
| Product | Why It’s Helpful |
| Oil Funnel | Prevents spills when topping up oil. |
| Microfiber Cloths | Cleans the dipstick for accurate readings. |
| Nitrile Gloves | Keep your hands clean. |
| LED Inspection Flashlight | Makes it easier to see inside the engine bay. |
| Full Synthetic Engine Oil | For topping up, if it matches your owner’s manual. |
In short, here’s the quick kit: an engine oil dipstick, paper towel, a funnel, and the right new oil. With these, you’re set. No fancy tools required – many vehicles even have a sticker or diagram under the hood showing where the dipstick and oil filler cap are. Knowing where things live in the engine bay makes it easier.
How to Check Oil in a Car Step by Step
First, a brief overview. The basic steps for how to check oil are: park on level ground, engine off and cooled or as directed; find the dipstick; pull and wipe it; reinsert it fully and pull it again to take a reading; then compare that reading to the minimum/maximum marks. Each of these is an easy action you can do yourself. We’ll walk through each carefully below.
1. Park on Level Ground and Turn Off the Car’s Engine
Always do this on even ground. If your car is on a hill, oil will slosh to one side of the pan, giving a false low or high reading. If you’ve just been driving hard, give it a minute to cool so you don’t burn yourself. Let the oil drain back down into the pan – 5 minutes are usually enough. Now lift the hood (there’s usually a lever inside, and a latch under the hood) and secure it.

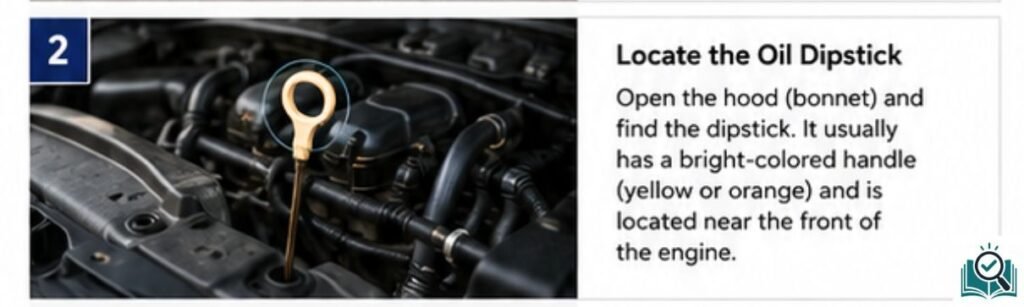
2. Locate the Oil Dipstick
In the engine bay, find the dipstick. It is typically a thin metal rod with a looped handle. The handle is often bright yellow or orange and might have an oil-can icon on it. If you don’t see it immediately, check the owner’s manual or look around the perimeter of the engine. The dipstick sits in a small tube that leads down into the crankcase (oil sump).
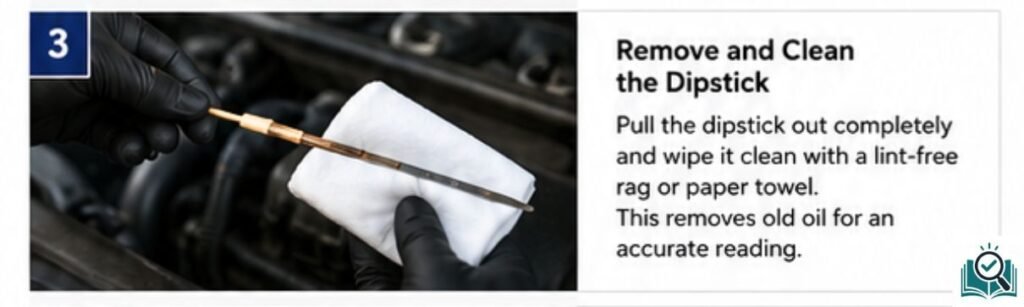
3. Remove and Clean the Dipstick
Grasp the dipstick handle and pull it all the way out of its tube. Now wipe the stick clean with a rag or paper towel, removing all oil from the end. This first wipe is important: it resets the oil level marker, so you’ll get an accurate fresh reading on the second pull.
Inspect the cleaned tip: you should see two markers (lines or holes). The lower mark usually means “ADD” or low, and the upper mark means “FULL” or safe. Some dipsticks have letters L (low) and H (high), pinholes, or a crosshatched area between the lines – but either way, one mark is minimum, one is maximum.
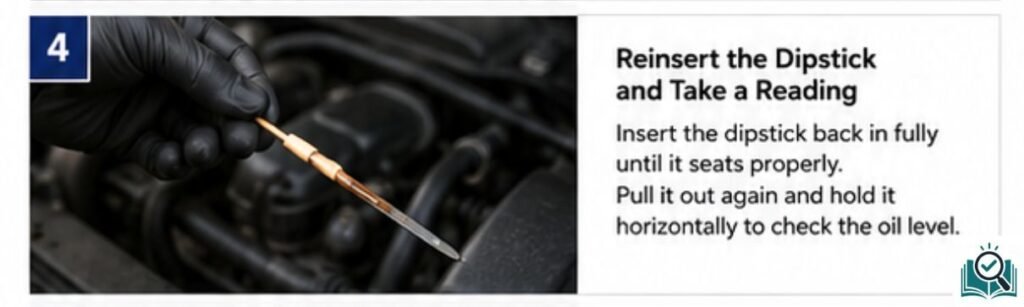
4. Reinsert the Dipstick and Take a Reading
Push the dipstick all the way back into the tube. Then pull it out again. Hold it horizontally and look at how high the oil reaches on the stick. You’ll see a streak of fresh oil. If the oil streak is at or above the upper mark, you’re good. If it’s at or near the lower mark, you need to top up. If it’s below the minimum line, the engine is low on oil and you should add the correct engine oil based on the car model and manual.
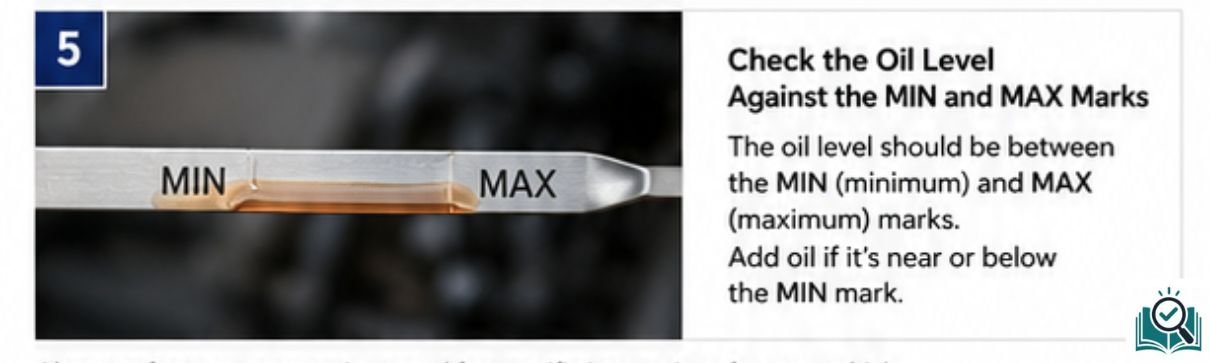
5. Check the Oil Level Against the MIN and MAX Marks
Ideally, the oil level is slightly below or just at the max line, well above the min. If you’re in the add zone or below the MIN mark, add engine oil. If it’s fine, simply reinsert the dipstick and close the hood – you’re done for now. Remember that most engines run safely as long as oil is between these marks. It doesn’t have to sit exactly on the top line.
How Do You Read an Oil Dipstick Correctly
The dipstick has oil level markings that show you where the oil level should be. These markings are usually labeled “MIN” and “MAX”, or as two small holes or dashes. Sometimes the area between the marks is crosshatched. The rule is: if the oil streak reaches or is between MIN and MAX, the level is fine. Below MIN means low oil, above MAX means too much oil.
| Dipstick Reading | What It Means | What You Should Do |
| Below MIN | The engine oil is below the minimum level. | Add the correct engine oil immediately and check again. |
| Between MIN and MAX | The oil level is within the safe operating range. | No action is needed. Continue checking it regularly. |
| Near MAX | The oil is at the ideal level. | Leave it as it is. |
| Above MAX | The engine contains too much oil. | Remove the excess oil. |
Different dipsticks use different symbols: some have letters (L/H), some have words (ADD/FULL), or even holes that the oil will touch if high enough. When you pull the dipstick and see the oil on it, note where the top of the oil line falls relative to those marks. Between MIN and MAX is safe. Below MIN is too low and you should add oil. Above MAX is overfilled and needs correction.
Once you know how to read an oil dipstick, you can easily understand how to check oil. This quick check ensures the oil flow stays smooth. If the dipstick tip is dry or only shows a tiny wet line below the lower mark, it’s time to add oil. Either way, the height of that streak relative to the minimum and maximum oil level marks is your indicator.
How to Check Oil in a Toyota Sienna
How to check oil in a Toyota Sienna follows the same basic process as most modern vehicles. Park the van on level ground, switch off the engine, and wait for the time recommended in the owner’s manual. Open the hood, locate the oil dipstick, wipe it clean, insert it fully, and pull it out again to inspect the oil level. The oil should remain between the minimum and maximum marks. If it falls below the minimum mark, add the correct 0W-20 synthetic oil or the oil specified for your model year.
How to Check Oil in a Ford Vehicle
Whether you drive a Ford F-150, Escape, Explorer, or another Ford model, the steps for how to check oil remain straightforward. The steps to check engine oil are the same as those for the Toyota Sienna. Many Ford engines use 5W-30 or 5W-20, depending on the car’s engine and the model year. Always verify the required specification from the car’s manual before adding motor oil.
How Do You Know If Your Engine Oil Is Low?
Aside from the dipstick, there are warning signs of low oil. The most direct clue is the dipstick itself reading low – but you asked about other indicators, so here are common ones:
If the oil warning light on the dashboard lights up, treat it as urgent. You might also notice strange engine noises like ticking or knocking; these sounds often mean the engine isn’t getting enough lubrication. Another sign is visible oil leaks under the car or a burning oil smell. If the car consumes oil fast, that’s another red flag.
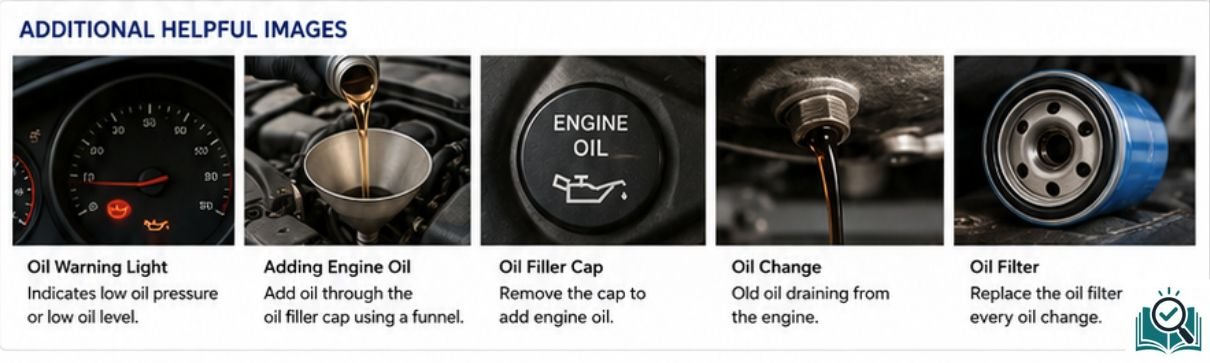
To put it simply, how to tell if engine oil is low: check the dipstick – that’s the surest way. Don’t rely solely on lights or sounds. As one expert warns, “The oil light may activate due to low oil levels, indicating a need for an immediate oil check or refill”. In practice, even if no warning light is on, you should still peek under the hood regularly.
How to Add Engine Oil to Car
When the dipstick shows low oil, adding a bit is easy. First, find the oil filler cap on top of the engine. For adding the engine oil properly: remove the cap, place a funnel in the opening, and pour in small amounts of the correct oil. Add the oil slowly to avoid overfilling.
Only add until the dipstick shows the oil level up to the lower or middle of the safe range (between the min and max). Overfilling can be just as bad as low oil. Once you’ve topped up, replace the oil filler cap tightly. Run the engine briefly, then recheck again for leaks and level.
How to Choose the Right Engine Oil for Your Car
Picking engine oil sounds tricky, but the solution is simple: follow the manufacturer recommendations in your owner’s manual. The manual will list the approved oil viscosity (like 5W-30, 0W-20) and specs (API or ACEA ratings). For most late-model cars, the factory filler oil is synthetic or a blend. Synthetic oils last longer and handle heat better.
Here’s a quick guide: if your car’s manual says 0W-20 or 5W-30, stick with that weight. 0W-20 oils flow better in cold weather, which can slightly improve fuel economy and cold start protection. 5W-30 is thicker at high temps and is commonly used in many vehicles. Also consider mileage: high-mileage oils have additives for older engines (75,000+ miles).
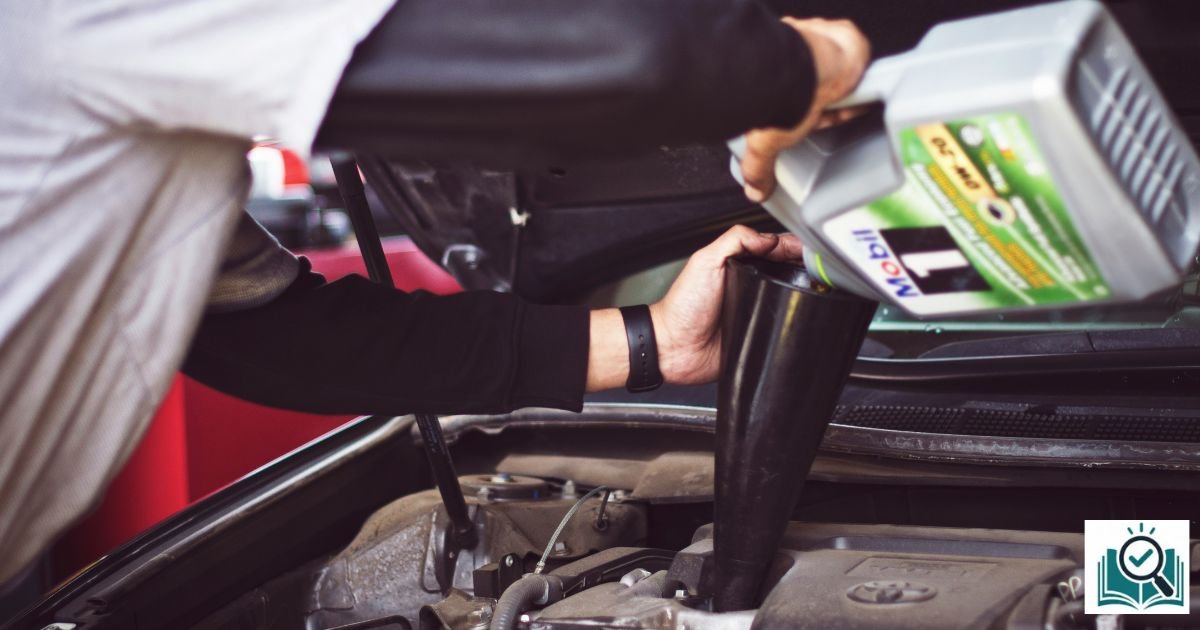
Always look for the API Certification or other ratings on the bottle, and use the oil grade recommended. If in doubt, you can often find an oil selector on the oil brand’s website by entering your car’s year/make/model. But the manual is king: it’s written by the engineers who built your engine.
How to Check If Your Engine Oil Is Bad
Not all dark oil is bad oil. Even normal oil will darken with use. However, certain signs on the dipstick or oil itself mean trouble. Pull the dipstick after running the engine briefly and look at the oil’s appearance.
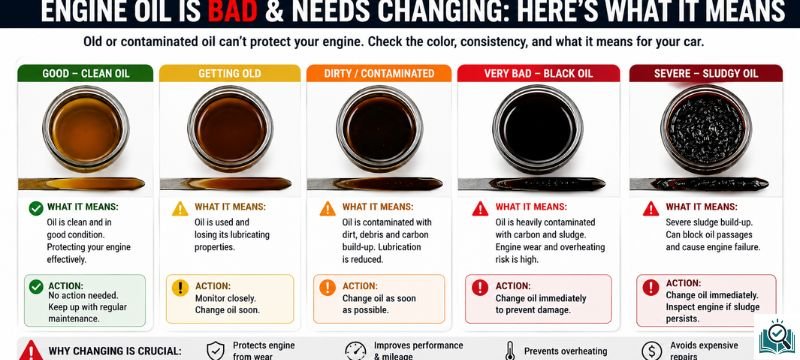
-Dirty/black oil: If the oil is jet-black and gritty between fingers, it’s overdue for a change. Normal motor oil should be a golden or brown tint when new, and may turn dark brown or black after 3,000–5,000 miles.
-Sludge and grit: If you see sludge (thick, tar-like blobs) or gritty particles on the stick, the oil is old or contaminated. This can happen if oil changes were skipped.
– Metal flecks: Shiny bits in oil usually mean metal wear inside your engine – not a good sign. It could point to bearing or piston damage.
– Milky or foamy oil: Cream-colored or foamy oil indicates coolant (water) has mixed in, often from a blown head gasket. This oil must be changed immediately and the leak fixed.
In short, dirty oil is not automatically bad, but extremely dark gritty oil or milky oil are red flags. When inspecting, you might think “what color should engine oil be? – a healthy used oil is amber to brown, not gray or white. If you’re unsure, change it.
What Color Should Engine Oil Be?
Oil color tells a story. Here’s a quick breakdown of color clues on your dipstick:
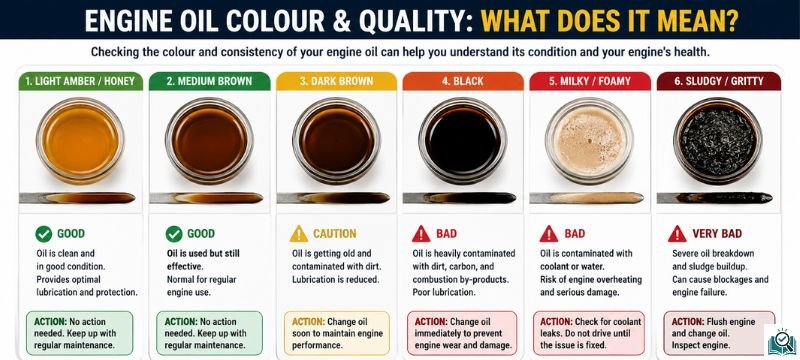
A fresh engine oil has golden brown to amber color. But as the oil is used, it turns into darker shades. Dark oil does not necessarily means that the oil is bad and needs changing. It has just changed color as a result of being contaminated or collecting combustion by-products. However, if the oil color has changed to milky, it can indicate coolant contamination. It is recommended to get it checked by a mechanic if that’s the case.
Why Checking Your Engine Oil Is Important
Engine oil has a lot of benefits. It forms a protective film on all the moving parts in the engine, greatly reducing wear and tear. In plain terms, oil is to your engine what grease is to a squeaky hinge. Without sufficient oil, metal parts rub directly on each other, causing friction, heat, and rapid engine damage.
If oil falls below the minimum level, metal parts can overheat or seize, potentially destroying the engine. In short, keeping the oil between the minimum and maximum oil level marks on the dipstick is key. Ignoring changing engine oil might lead to future costly repairs or in the worst case scenario might lead to needing a whole new engine. That is why learning how to check oil is an important skill.
When Should You Check Your Engine Oil?
Make checking oil a habit. For most drivers, a quick oil check once a month or every few gas fill-ups is wise. If you’re heading on a long trip, check before you go. In fact, Car and Driver suggests a good routine is checking oil once a week for a month to see how fast it falls off, then checking monthly afterwards. This tells you if your engine is burning or leaking oil.
Always do it under the right conditions. Park on level ground (uneven ground gives a false low reading) and turn off the engine. Wait a few minutes for the oil to drain back to the sump before pulling the dipstick.
Some owners wonder if you should check engine oil hot or cold?” It depends on the car. Many manuals say check when the engine is cold (this ensures oil has settled), but others specify checking when it’s warm (but not just turned off). The safest bet is to follow your manufacturer recommendations or owner’s manual.
In practice, always aim for that middle zone. Keeping oil within the proper range avoids both extremes. If you ever fill a bit extra by mistake, drain it out. If oil is low, add to bring it up – it’s the balance that keeps the engine happy.
How to Check Oil Level in a Car on Dashboard
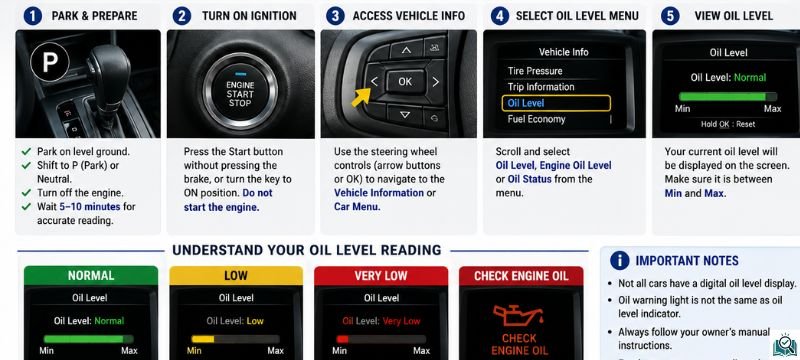
Some modern vehicles let you check the oil level through the dashboard or infotainment system instead of using a traditional dipstick. Park the car on level ground, follow the instructions in your owner’s manual, and access the vehicle information or maintenance menu to view the oil level. Keep in mind that not every car has an electronic oil-level monitor, and an oil warning light is not the same as an oil-level indicator. For the most accurate reading, always follow the manufacturer’s recommended procedure.
How Often Should You Check and Change Engine Oil?
How to check oil is simple and risk-free, so do it often. Many experts suggest making it a habit when you stop for gas – a quick peek at the dipstick. At the very least, check after every 1,000 miles or 3-4 fill-ups. This way you’ll notice a drop in oil level early on. If your car is old or burning oil, you might end up checking weekly or before each long drive.
Changing oil is a separate question. Modern cars with synthetic oil often only need an oil change every 7,500–10,000 miles or even longer. (The old rule of 3,000 miles is outdated for most newer cars.) Still, follow your vehicle’s service schedule. Your owner’s manual tells you exactly when to replace oil and filter.
Factors like city driving, towing, and climate can shorten that interval. For example, KBB notes that most drivers using synthetic oil can go ~8–9 months or 10,000 miles between oil changes under normal use.
Frequently Asked Questions About How to Check Oil
How Long You Should Wait to Check Oil After Driving?
Most of the car manufacturers advice waiting for several minutes ( about 5-10) before checking oil. However, the correct time depends upon the car’s model. So its better to go through car’s manual.
Can You Check Engine Oil Level From the Dashboard?
Yes, many modern cars have this feature. In this, the cars have electrical monitoring system that display the oil level on the dashboard. However, it can be a false alarm. Since the warning light can light up even the oil pressure is low.
What is the Correct Way to Check Oil?
The correct way to check oil is by parking on a levelled ground, waiting for the recommended time mentioned in car’s manual, and using gloves to take out dipstick. Cleaning the dipstick and reinserting it. Taking out the dipstick again and check the oil level against MIN and MAX mark.
Should I Check My Oil When The Engine is Hot or Cold?
It depends on the car model. However it is recommended to wait for at least 5-10 minutes after driving your car and parking it on a level ground. If unsure, consult your car’s manual.
How to Check Oil Level in Car Without Dipstick?
If your car doesn’t have a dipstick, you can use the electronic oil level monitor through the dashboard based on the model. Park on level ground and follow the instructions in the car manual for the most accurate reading.
Conclusion
So that was a detailed discussion about “ How to check oil”. Always record your oil checks and changes. As one expert put it, “Regular oil changes are an important part of preventive maintenance and can help prevent engine wear.” Follow those guidelines, and your engine will thank you. Contact Us if you have more question.

Zoha is a dedicated content writer who enjoys researching useful topics and turning detailed information into clear, practical and easy-to-understand articles. With a focus on helpful and reader-friendly content, Zoha creates well researched guides designed to answer everyday questions and help readers make decisions.